Alta definición
Registro en forodvd
+ Responder tema
Resultados 1 al 15 de 797

Guía: Como mejorar la imagen por software y hardware

Vista híbrida

Mensaje anterior Mensaje anterior   Próximo mensaje Próximo mensaje
  1. #1
    aprendiz Avatar de maxxxmuerte
    Registro
    06 ene, 14
    Ubicación
    vizcaya
    Mensajes
    166
    Agradecido
    145 veces

    Predeterminado Re: Guía: Como mejorar la imagen por software y hardware

    Cita Iniciado por baseq2 Ver mensaje
    Siguiendo con mi búsqueda incansable y después de haber pasado buenos ratos con el Avisynth (Muy potente por cierto, pero tragón de CPU que lo hace inviable) parece que he encontrado la madre del cordero en esto de mejorar la nitidez y la profundidad por software.

    Mi infructuosa búsqueda con el avisynth me llevó a plantearme algo: Ha de existir una código parecido pero que tire por GPU tal y como hacen los shaders del port player, MPC, o kmplayer.

    Y ya te digo que si existe! Concretamente se llama LUMA SHARPEN y es creación del crack: Christian Cann Schuldt Jensen ~ CeeJay.dk

    Básicamente hace un sharpen del Luma y luego una desviación del luma con varias pasadas. Una cosa rara que no entiendo mucho pero que es realmente efectiva. Es lo más parecido al Darbee que he podido conseguir. Lejos quedan los días del los sharpen 5x5, sharpen complex y compañía. ESTO SI ES UN FILTRO.

    Y es que hay gente que son unos catacracs como este este CeeJay.dk. El filtro Lumasharpen es una adaptación del su software de mejora de imagen para juegos: PARA TODOS LOS JUEGOS (darbee en los juegos de PC, sí) Se llama SweetFX SweetFX Shader Suite Download Version 1.5 Y aparte del Lumasharpen esto aplica "bloom" entre otros muchos shaders con un rendimiento excelente para los juegos.

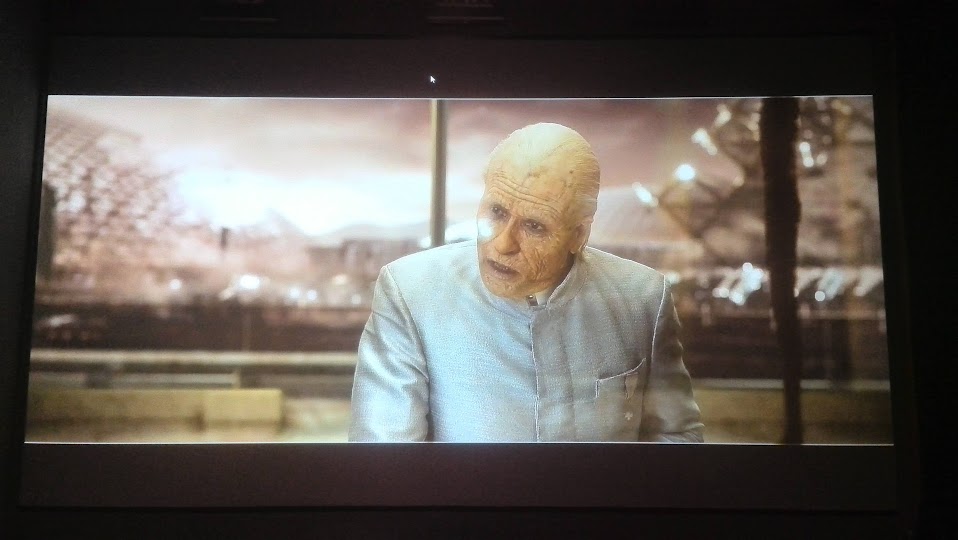
    Pues bien, si nos centramos en el que está portado para TXT podemos conseguir cosas como estas con nuestras movies:

    Atentos, aquí el filtro está bastante fuerte para que se aprecie bien en las fotos. No hagáis caso de la colorimetria por que mi cámara no es capaz de hacerlo mejor. Lo siento.

    Antes:


    Después:


    Antes:


    Después:


    Antes:


    Despues:


    Vale... Insisto que están muy fuertes para que se vea bien. "Todo y que a mi me gusta que sea fuerte".

    Vamos a lo práctico;

    Como lo pongo en mi reproductor? Fácil.


    Este es el código. Se trata de copiarlo y pegarlo en un TXT que guardaremos en la carpeta "unidad:\archivos de programa\Daumn\potplayer\Pxshder\" o la ruta de vuestro reproductor.

    Para activarlo es como todos los shaders. No voy a entrar en ese detalle ahora.

    Lo que sí que es importante es como modificar los valores para dejarlo al gusto. Yo por ejemplo he guardado varias copias del mismo pero con valores diferentes así según la película lo pongo más fuerte o más flojo.

    Lo parámetros a modificar son estos:

    // -- Sharpening --
    #define sharp_strength 0.65 //[0.10 to 3.00] Strength of the sharpening
    #define sharp_clamp 0.035 //[0.000 to 1.000] Limits maximum amount of sharpening a pixel recieves - Default is 0.035

    // -- Advanced sharpening settings --
    #define pattern 2 //[1|2|3|4] Choose a sample pattern. 1 = Fast, 2 = Normal, 3 = Wider, 4 = Pyramid shaped.
    #define offset_bias 1.0 //[0.0 to 6.0] Offset bias adjusts the radius of the sampling pattern.
    //I designed the pattern for offset_bias 1.0, but feel free to experiment.

    Muy fácil. Yo os recomiendo poner un 2.0 en "#define sharp_strength" y un 6 en "#define offset_bias" y a partir de aquí empezar a bajar valores. (lo que pongo es muy fuerte, pero así veis lo que hace)

    #define pattern 2 //[1|2|3|4] Choose a sample pattern. 1 = Fast, 2 = Normal, 3 = Wider, 4 = Pyramid shaped.
    Esto cambia la forma de hacer lo que hace. Probad el 8 aunque aquí no lo ponga. Que es muy bueno.

    Cuando cambiéis un valor no tenéis que cerrar el pot etc etc. Solo guardáis el documentos, desabilitais el filtro, lo habilitáis y ya se verán los cambios.

    Si alguno conoce algo mejor que no dude en postearlo!

    Ala!
    baseq2 ERES MI IDOLO CRACK MAS QUE CRACK...como me gusta este filtro txooo.
    joer que bueno es. ale a toquetear se ha dicho. JOEER se esfumo el ruido en tomas oscuras!!!. INCREIBLE!!!. DE VERDAD ES MUY BUENO ESTE FILTRO.
    GRACIAS baseq2 NO SOLO POR COMPARTIRLO TAMBIE POR TUS EXPLICACIONES DE COMO ENRREDAR EN EL .

  2. #2
    pulgadas de pasión Avatar de baseq2
    Registro
    30 nov, 10
    Ubicación
    Mataró
    Mensajes
    2,045
    Agradecido
    1852 veces

    Predeterminado Re: Guía: Como mejorar la imagen por software y hardware

    Cita Iniciado por maxxxmuerte Ver mensaje
    baseq2 ERES MI IDOLO CRACK MAS QUE CRACK...como me gusta este filtro txooo.
    joer que bueno es. ale a toquetear se ha dicho. JOEER se esfumo el ruido en tomas oscuras!!!. INCREIBLE!!!. DE VERDAD ES MUY BUENO ESTE FILTRO.
    GRACIAS baseq2 NO SOLO POR COMPARTIRLO TAMBIE POR TUS EXPLICACIONES DE COMO ENRREDAR EN EL .
    A ti, crack
    // Mi rincón: click // Sácale partido al Htpc: click // Calibra y vencerás: click //

  3. #3
    diplomado Avatar de hemiutut
    Registro
    02 dic, 11
    Mensajes
    6,361
    Agradecido
    7905 veces

    Predeterminado Re: Guía: Como mejorar la imagen por software y hardware

    Ahora no se activan los pixel shaders,ni los 3 que tenía antes ni esté nuevo.
    ¿ Tengo que desinstalar el programa y volverlo a instalar ?.
    Gracias baseq2 por la ayuda .

    Saludos......

  4. #4
    pulgadas de pasión Avatar de baseq2
    Registro
    30 nov, 10
    Ubicación
    Mataró
    Mensajes
    2,045
    Agradecido
    1852 veces

    Predeterminado Re: Guía: Como mejorar la imagen por software y hardware

    A mi me encanta poner este; Guardarlo como Vibrance. También es de Ceejay.dk el puto amo:

    /* --- Vibrance settings --- */

    #define Vibrance 0.40 //Intelligently saturates (or desaturates if you use negative values) the pixels depending on their original saturation.


    /* --- Defining Constants --- */

    sampler s0 : register(s0);


    /* --- Vibrance --- */
    /*
    by Christian Cann Schuldt Jensen ~ CeeJay.dk

    Vibrance intelligently boosts the saturation of pixels
    so pixels that had little color get a larger boost than pixels that had a lot.

    This avoids oversaturation of pixels that were already very saturated.
    */

    float4 VibrancePass( float4 colorInput )
    {
    float4 color = colorInput; //original input color
    float3 lumCoeff = float3(0.2126, 0.7152, 0.0722); //Values to calculate luma with

    float luma = dot(lumCoeff, color.rgb); //calculate luma (grey)

    float max_color = max(max(colorInput.r,colorInput.g),colorInput.b); //Find the strongest color
    float min_color = min(min(colorInput.r,colorInput.g),colorInput.b); //Find the weakest color

    float color_saturation = max_color - min_color; //The difference between the two is the saturation

    //color = lerp(luma, color, (1.0 + (Vibrance * (1.0 - color_saturation)))); //extrapolate between luma and original by 1 + (1-saturation)

    color = lerp(luma, color, (1.0 + (Vibrance * (1.0 - (sign(Vibrance) * color_saturation))))); //extrapolate between luma and original by 1 + (1-saturation)

    return color; //return the result
    //return color_saturation.xxxx; //Visualize the saturation
    }

    /* --- Main --- */

    float4 main(float2 tex : TEXCOORD0) : COLOR {
    float4 c0 = tex2D(s0, tex);

    c0 = VibrancePass(c0);

    return c0;
    }
    Para cambiar el efecto hay que editar este parámetro:

    #define Vibrance 0.40

    Ponerlo en 2.0 y al ver que pasa lo bajáis. Es como pasar de ver una peli en blanco y negro a una en color

    Es la polla literalmente, por que aumenta la saturación de las partes poco coloreadas. Así que no va a subir según que colores pero si subirá los que estén apagados.
    // Mi rincón: click // Sácale partido al Htpc: click // Calibra y vencerás: click //

  5. #5
    honorable Avatar de kawito
    Registro
    05 ene, 12
    Ubicación
    Sevilla
    Mensajes
    583
    Agradecido
    363 veces

    Predeterminado Re: Guía: Como mejorar la imagen por software y hardware

    Cita Iniciado por baseq2 Ver mensaje
    A mi me encanta poner este; Guardarlo como Vibrance. También es de Ceejay.dk el puto amo:


    Para cambiar el efecto hay que editar este parámetro:

    #define Vibrance 0.40

    Ponerlo en 2.0 y al ver que pasa lo bajáis. Es como pasar de ver una peli en blanco y negro a una en color

    Es la polla literalmente, por que aumenta la saturación de las partes poco coloreadas. Así que no va a subir según que colores pero si subirá los que estén apagados.
    Maravilla de la técnica. Es como dices satura los colores de forma "inteligente" para que quede una imagen más viva. Yo estoy haciendo tres o cuatro niveles del Vibrance y del Lumasharpen para elegir según la película. Muchas gracias y no dudes en postear todo lo que encuentres jeje. Un saludo!

  6. #6
    pulgadas de pasión Avatar de baseq2
    Registro
    30 nov, 10
    Ubicación
    Mataró
    Mensajes
    2,045
    Agradecido
    1852 veces

    Predeterminado Re: Guía: Como mejorar la imagen por software y hardware

    No lo dudes compañero. A mi este foro me ha aportado mucho. Así que es como si le debiese todo
    // Mi rincón: click // Sácale partido al Htpc: click // Calibra y vencerás: click //

  7. #7
    honorable Avatar de kawito
    Registro
    05 ene, 12
    Ubicación
    Sevilla
    Mensajes
    583
    Agradecido
    363 veces

    Predeterminado Re: Guía: Como mejorar la imagen por software y hardware

    Por cierto, ¿influye ponerlo en pre-resize o en post-resize? Y si es así, en cuál se deben poner estos dos(Vibrance y Luma)?

  8. #8
    experto Avatar de onizuka26
    Registro
    24 ago, 09
    Ubicación
    Granada grupo wassap preguntar
    Mensajes
    1,789
    Agradecido
    1423 veces

    Predeterminado Re: Guía: Como mejorar la imagen por software y hardware

    oye se hace complicado encontrar algo ya en este hilo, pq no se unifica la informacion interesante en el primer mensaje???

  9. #9
    aprendiz
    Registro
    20 ene, 13
    Mensajes
    108
    Agradecido
    205 veces

    Predeterminado Re: Guía: Como mejorar la imagen por software y hardware

    Podríais probar el pack completo con el shader curves que comenté en el post del Darbee:

    Cita Iniciado por Delfin_ Ver mensaje
    Yo no he visto el Darbee en acción así que no puedo opinar, pero en base a lo que decís que hace (contraste, gammas, sharpen ...) ¿habeis probado con esta combinación de shaders?:

    En pre-resize:

    Curves, para jugar con el contraste y s-curves (hace un efecto parecido a lo que comentais de "quitar neblina").

    Código:
    /* --- Curves settings --- */
    #define Curves_contrast 0.30  //[-1.0 to 1.0] The amount of contrast you want
    
    // -- Advanced curve settings --
    #define Curves_formula 3      //[1 to 7] The constrast s-curve you want to use. 
    /* --- End of settings --- */
    
    /* ---  Defining Constants --- */
    
    sampler s0 : register(s0);
    
    
    /* --- Curves --- */
    /*
      by Christian Cann Schuldt Jensen ~ CeeJay.dk
      
      Curves, uses S-curves to increase contrast, without clipping highlights and shadows.
    */
    
    float4 CurvesPass( float4 colorInput )
    {
      float3 color = colorInput.rgb; //original input color
      float3 lumCoeff = float3(0.2126, 0.7152, 0.0722);  //Values to calculate luma with
      float Curves_contrast_blend = Curves_contrast;
      float PI = acos(-1); //3.14159265
    
      //calculate luma (grey)
      float luma = dot(lumCoeff, color);
    	
      //calculate chroma
    	float3 chroma = color - luma;
    	
    	//Apply curve to luma
    	
    	// -- Curve 1 --
      #if Curves_formula == 1
        luma = sin(PI * 0.5 * luma); // Sin - 721 amd fps, +vign 536 nv
        luma *= luma;  
      #endif
      
      // -- Curve 2 --
      #if Curves_formula == 2
        luma = ( (luma - 0.5) / (0.5 + abs(luma-0.5)) ) + 0.5;
      #endif
    
    	// -- Curve 3 --
      #if Curves_formula == 3
        //luma = smoothstep(0.0,1.0,luma); //smoothstep
        luma = luma*luma*(3.0-2.0*luma); //faster smoothstep alternative
      #endif
    
    	// -- Curve 4 --
      #if Curves_formula == 4
        luma = 1.1048 / (1.0 + exp(-3.0 * (luma * 2.0 - 1.0))) - (0.1048 / 2.0); //exp formula
      #endif
    
    	// -- Curve 5 --
      #if Curves_formula == 5
        luma = 0.5 * (luma + 3.0 * luma * luma - 2.0 * luma * luma * luma); //a simple catmull-rom (0,0,1,1)
        Curves_contrast_blend = Curves_contrast * 2.0; //I multiply by two to give it a strength closer to the other curves.
      #endif
    
     	// -- Curve 6 --
      #if Curves_formula == 6
        luma = luma*luma*luma*(luma*(luma*6.0 - 15.0) + 10.0); //Perlins smootherstep
    	#endif
    	
    	// -- Curve 7 --
      #if Curves_formula == 7
        luma = ((luma-0.5) / ((0.5/(4.0/3.0)) + abs((luma-0.5)*1.25))) + 0.5;
      #endif
    	
      
    	//Add back the chroma
    	color = luma + chroma;
    	
    	//Blend by Curves_contrast
    	colorInput.rgb = lerp(colorInput.rgb, color, Curves_contrast_blend);
    	
      //Return the result
      return colorInput;
    }
    
    /* --- Main --- */
    
    float4 main(float2 tex : TEXCOORD0) : COLOR {
    	float4 FinalColor = tex2D(s0, tex);
    
    	FinalColor = CurvesPass(FinalColor);
    
    	return FinalColor;
    }
    Post-resize:

    Lumasharpen, si está muy fuerte podeis probar con un valor 0.5 en define sharp_strength y 0.035 en define sharp_clamp.
    Tambien podeis probarlo en pre-resize en fnción del algoritmo de escalado que useis (supongo).

    Código:
    /*
       _____________________
         
         LumaSharpen 1.3.10
       _____________________ 
    
      by Christian Cann Schuldt Jensen ~ CeeJay.dk
      
      It blurs the original pixel with the surrounding pixels and then subtracts this blur to sharpen the image.
      It does this in luma to avoid color artifacts and allows limiting the maximum sharpning to avoid or lessen halo artifacts.
      
      This is similar to using Unsharp Mask in Photoshop.
        
      Compiles with 3.0
    */
    
    // .----------------------------------------------------._User settings_.---------------------------------------------------. 
    
    // -- Sharpening --
    #define sharp_strength 1.0 // Strength of the sharpening - You should probably use something between 0.2 and 2.0 - default is 1.0
    #define sharp_clamp 0.050  // Limits maximum amount of sharpening a pixel recieves - Default is 0.050
    
    // -- Advanced sharpening settings --
    #define pattern 2          // Choose a sample pattern ( 1, 2, 3 or 4 ) - I suggest 2
    #define offset_bias 1.0    // Offset bias adjusts the radius of the sampling pattern.
                               // I designed the pattern for offset_bias 1.0, but feel free to experiment.
    
    // .----------------------------------------------------._Debug settings_.--------------------------------------------------. 
    
    #define splitscreen 0      // Enables the before-and-after splitscreen comparison mode. Left side is before.
    #define show_sharpen 0     // Visualize the strength of the sharpen (multiplied by 4 to see it better)
    
    // .--------------------------------------------------._Developer settings_.------------------------------------------------. 
    
    #define CoefLuma float4(0.2126, 0.7152, 0.0722,0)      // BT.709 & sRBG luma coefficient (Monitors and HD Television)
    //#define CoefLuma float4(0.299, 0.587, 0.114,0)       // BT.601 luma coefficient (SD Television)
    //#define CoefLuma float4(1.0/3.0, 1.0/3.0, 1.0/3.0,0) // Equal weight coefficient
    
    #define sharp_strength_luma (CoefLuma * sharp_strength)
    
    // .--------------------------------------------------._Defining constants_.------------------------------------------------. 
    
    #ifndef s0
      sampler s0 : register(s0);
      #define s1 s0
    //sampler s1 : register(s1);
    
    //float4 p0 : register(c0);
      float4 p1 : register(c1);
    
    //  #define width (p0[0])
    //  #define height (p0[1])
    //  #define counter (p0[2])
    //  #define clock (p0[3])
    //  #define px (p1[0]) //one_over_width 
    //  #define py (p1[1]) //one_over_height
    
      #define px (p1.x) //one_over_width 
      #define py (p1.y) //one_over_height
    
      //#define pxy float2(p1.xy)
    
      //#define PI acos(-1)
      #define target 1 
    #endif
    
    
    // .------------------------------------------------------._Main code_.-----------------------------------------------------. 
    
    #if target == 1
    float4 main( float2 tex : TEXCOORD0 ) : COLOR  // Use with Shaderanalyzer and MPC-HC
    #else
    float4 LumaSharpenPass( float2 tex ) 
    #endif
    {
    
      // -- Get the original pixel --
      float4 ori = tex2D(s1, tex);       // ori = original pixel


    // .--------------------------------------------------._Sampling patterns_.-------------------------------------------------. 
    
      //   [ NW,   , NE ] Each texture lookup (except ori)
      //   [   ,ori,    ] samples 4 pixels
      //   [ SW,   , SE ]
    
      // -- Pattern 1 -- A (fast) 7 tap gaussian using only 2+1 texture fetches.
      #if pattern == 1
    
    	// -- Gaussian filter --
    	//   [ 1/9, 2/9,    ]     [ 1 , 2 ,   ]
    	//   [ 2/9, 8/9, 2/9]  =  [ 2 , 8 , 2 ]
     	//   [    , 2/9, 1/9]     [   , 2 , 1 ]
    
        float4 blur_ori = tex2D(s0, tex + (float2(px,py) / 3) * offset_bias);  // North West
        blur_ori += tex2D(s0, tex + (float2(-px,-py) / 3) * offset_bias); // South East
    
        //blur_ori += tex2D(s0, tex + float2(px,py) / 3 * offset_bias); // North East
        //blur_ori += tex2D(s0, tex + float2(-px,-py) / 3 * offset_bias); // South West
    
        blur_ori /= 2;  //Divide by the number of texture fetches
        
        sharp_strength_luma *= 1.5; // Adjust strength to aproximate the strength of pattern 2
    
      #endif
      
      // -- Pattern 2 -- A 9 tap gaussian using 4+1 texture fetches.
      #if pattern == 2
    
    	// -- Gaussian filter --
    	//   [ .25, .50, .25]     [ 1 , 2 , 1 ]
    	//   [ .50,   1, .50]  =  [ 2 , 4 , 2 ]
     	//   [ .25, .50, .25]     [ 1 , 2 , 1 ]
    
    
        float4 blur_ori = tex2D(s0, tex + float2(px,-py) * 0.5 * offset_bias); // South East
        blur_ori += tex2D(s0, tex + float2(-px,-py) * 0.5 * offset_bias);  // South West    
        blur_ori += tex2D(s0, tex + float2(px,py) * 0.5 * offset_bias); // North East
        blur_ori += tex2D(s0, tex + float2(-px,py) * 0.5 * offset_bias); // North West
    
        blur_ori *= 0.25;  // ( /= 4) Divide by the number of texture fetches
    
      #endif 
    
      // -- Pattern 3 -- An experimental 17 tap gaussian using 4+1 texture fetches.
      #if pattern == 3
    
    	// -- Gaussian filter --
    	//   [   , 4 , 6 ,   ,   ]
    	//   [   ,16 ,24 ,16 , 4 ]
    	//   [ 6 ,24 ,   ,24 , 6 ]
    	//   [ 4 ,16 ,24 ,16 ,   ]
    	//   [   ,   , 6 , 4 ,   ]
    
        float4 blur_ori = tex2D(s0, tex + float2(0.4*px,-1.2*py)* offset_bias);  // South South East
        blur_ori += tex2D(s0, tex + float2(-1.2*px,-0.4*py) * offset_bias); // West South West
        blur_ori += tex2D(s0, tex + float2(1.2*px,0.4*py) * offset_bias); // East North East
        blur_ori += tex2D(s0, tex + float2(-0.4*px,1.2*py) * offset_bias); // North North West
    
        blur_ori *= 0.25;  // ( /= 4) Divide by the number of texture fetches
        
        sharp_strength_luma *= 0.51;
      #endif
    
      // -- Pattern 4 -- A 9 tap high pass (pyramid filter) using 4+1 texture fetches.
      #if pattern == 4
    
    	// -- Gaussian filter --
    	//   [ .50, .50, .50]     [ 1 , 1 , 1 ]
    	//   [ .50,    , .50]  =  [ 1 ,   , 1 ]
     	//   [ .50, .50, .50]     [ 1 , 1 , 1 ]
    
        half4 blur_ori = tex2D(s0, tex + float2(0.5 * px,-py * offset_bias));  // South South East
        blur_ori += tex2D(s0, tex + float2(offset_bias * -px,0.5 * -py)); // West South West
        blur_ori += tex2D(s0, tex + float2(offset_bias * px,0.5 * py)); // East North East
        blur_ori += tex2D(s0, tex + float2(0.5 * -px,py * offset_bias)); // North North West
    
        //blur_ori += (2 * ori); // Probably not needed. Only serves to lessen the effect.
    	
        blur_ori /= 4;  //Divide by the number of texture fetches
    
        sharp_strength_luma *= 0.666; // Adjust strength to aproximate the strength of pattern 2
      #endif
    
      // -- Pattern 8 -- A (slow) 9 tap gaussian using 9 texture fetches.
      #if pattern == 8
    
    	// -- Gaussian filter --
    	//   [ 1 , 1 , 1 ]
    	//   [ 1 , 1 , 1 ]
     	//   [ 1 , 1 , 1 ]
    
        half4 blur_ori = tex2D(s0, tex + float2(-px,py) * offset_bias); // North West
        blur_ori += tex2D(s0, tex + float2(px,-py) * offset_bias);     // South East
        blur_ori += tex2D(s0, tex + float2(-px,-py)  * offset_bias);  // South West
        blur_ori += tex2D(s0, tex + float2(px,py) * offset_bias);    // North East
        
        half4 blur_ori2 = tex2D(s0, tex + float2(0,py) * offset_bias); // North
        blur_ori2 += tex2D(s0, tex + float2(0,-py) * offset_bias);    // South
        blur_ori2 += tex2D(s0, tex + float2(-px,0) * offset_bias);   // West
        blur_ori2 += tex2D(s0, tex + float2(px,0) * offset_bias);   // East
        blur_ori2 *= 2;
    
        blur_ori += blur_ori2;
        blur_ori += (ori * 4); // Probably not needed. Only serves to lessen the effect.
    
        // dot()s with gaussian strengths here?
    
        blur_ori /= 16;  //Divide by the number of texture fetches
    
        //sharp_strength_luma *= 0.75; // Adjust strength to aproximate the strength of pattern 2
      #endif
    
      // -- Pattern 9 -- A (slow) 9 tap high pass using 9 texture fetches.
      #if pattern == 9
    
    	// -- Gaussian filter --
    	//   [ 1 , 1 , 1 ]
    	//   [ 1 , 1 , 1 ]
     	//   [ 1 , 1 , 1 ]
    
        half4 blur_ori = tex2D(s0, tex + float2(-px,py) * offset_bias); // North West
        blur_ori += tex2D(s0, tex + float2(px,-py) * offset_bias);     // South East
        blur_ori += tex2D(s0, tex + float2(-px,-py)  * offset_bias);  // South West
        blur_ori += tex2D(s0, tex + float2(px,py) * offset_bias);    // North East
        
        blur_ori += ori; // Probably not needed. Only serves to lessen the effect.
        
        blur_ori += tex2D(s0, tex + float2(0,py) * offset_bias);    // North
        blur_ori += tex2D(s0, tex + float2(0,-py) * offset_bias);  // South
        blur_ori += tex2D(s0, tex + float2(-px,0) * offset_bias); // West
        blur_ori += tex2D(s0, tex + float2(px,0) * offset_bias); // East
    
        blur_ori /= 9;  //Divide by the number of texture fetches
    
        //sharp_strength_luma *= (8.0/9.0); // Adjust strength to aproximate the strength of pattern 2
      #endif
      
    // .-----------------------------------------------._Sharpen_.-------------------------------------------------------. 
      
      // -- Calculate the sharpening --  
      float4 sharp = ori - blur_ori;  //Subtracting the blurred image from the original image
      
      // -- Adjust strength of the sharpening --
      float sharp_luma = dot(sharp, sharp_strength_luma); //Calculate the luma and adjust the strength
    
      // -- Clamping the maximum amount of sharpening to prevent halo artifacts --
      sharp_luma = clamp(sharp_luma, -sharp_clamp, sharp_clamp);  //TODO Try a curve function instead of a clamp
    
      // -- Combining the values to get the final sharpened pixel	--
      float4 done = ori + sharp_luma;    // Add the sharpening to the original.
     
    // .------------------------------------------._Returning the output_.-----------------------------------------------. 
    
      #if show_sharpen == 1
        //float3 chroma = ori - luma;
        //done = abs(sharp * 4).rrr;
        done = saturate(0.5 + (sharp_luma * 4)).rrrr;
      #endif
    
      #if splitscreen == 1
        if (tex.x < 0.5)
          done = ori;
      #endif
    
      return done;
    
    }
    Pre-resize:

    Vibrance para jugar con la saturación, satura cada pixel independientemente en función de lo saturado que esté en origen.

    Código:
    /* --- Vibrance settings --- */
    
    #define Vibrance 0.18  //Intelligently saturates (or desaturates if you use negative values) the pixels depending on their original saturation.
    
    
    /* ---  Defining Constants --- */
    
    sampler s0 : register(s0);
    
    
    /* --- Vibrance --- */
    /*
      by Christian Cann Schuldt Jensen ~ CeeJay.dk
      
      Vibrance intelligently boosts the saturation of pixels
      so pixels that had little color get a larger boost than pixels that had a lot.
      
      This avoids oversaturation of pixels that were already very saturated.
    */
    
    float4 VibrancePass( float4 colorInput )
    {
    	float4 color = colorInput; //original input color
      float3 lumCoeff = float3(0.2126, 0.7152, 0.0722);  //Values to calculate luma with
    
    	float luma = dot(lumCoeff, color.rgb); //calculate luma (grey) 
    
    	float max_color = max(max(colorInput.r,colorInput.g),colorInput.b); //Find the strongest color
    	float min_color = min(min(colorInput.r,colorInput.g),colorInput.b); //Find the weakest color
    	
      float color_saturation = max_color - min_color; //The difference between the two is the saturation
    
      //color = lerp(luma, color, (1.0 + (Vibrance * (1.0 - color_saturation)))); //extrapolate between luma and original by 1 + (1-saturation)
      
      color = lerp(luma, color, (1.0 + (Vibrance * (1.0 - (sign(Vibrance) * color_saturation))))); //extrapolate between luma and original by 1 + (1-saturation)
    
    	return color; //return the result
    	//return color_saturation.xxxx; //Visualize the saturation
    }
    
    /* --- Main --- */
    
    float4 main(float2 tex : TEXCOORD0) : COLOR {
    	float4 c0 = tex2D(s0, tex);
    
    	c0 = VibrancePass(c0);
    
    	return c0;
    }
    No sé si este último, el vibrance, sería necesario. Los que hayais visto el Darbee en acción probara activar y desactivar este shader aver si ayuda o no.

    Podéis personalizarlos en las primeras lineas de cada código.
    Habría que mirar si hay una versión mas nueva como ocurre con el LumaSharpen. Están optimizados para el mpc hc por lo que no se si funcionará Curves en Potplayer pero por probarlo (si funciona LumaSharpen y Vibrance podría ser que curves tambien).

    Fuente: Ficheros TXT

    Cita Iniciado por kawito Ver mensaje
    Por cierto, ¿influye ponerlo en pre-resize o en post-resize? Y si es así, en cuál se deben poner estos dos(Vibrance y Luma)?
    Los de nitidez es mejor en post-resize porque si no el poco o mucho ringing/aliasing que generen se verá escalado tambien. CeeJay.dk recomienda LumaSharpen en post-resize:

    I suggest you add it to the list of Post-resize shaders though, but it also works as pre-resize shader. You can even use both.
    I just use it as a post-resize shader though.
    Guru3D.com Forums - View Single Post - nVidia's FXAA mode (anti-aliasing)

    Edito: Se me olvidaba (tengo la cabeza hoy peor que de costumbre), CeeJay.dk ha dicho en el foro doom9 que pasaría algunos de los shaders de sweetfx a mpc hc por si quereis seguirle el rastro:

    Originally Posted by turbojet
    A bit off topic but speaking of competitive products, would you have interest in starting a thread about your pixel shaders in the software player forum? I ask because they are kind of difficult to track down and also I don't feel it's appropriate for anyone but you to start the thread since you are a member.

    Okay. I'll look into that later this week then when I have more time.

    I need to first create an updated package with all the filters from SweetFX that might be interesting for MPC users (are there other players that support shaders?) and perhaps a .reg file that will install them - it's annoying that MPC has no easy way to install new shader filter or options to control them, but I'll try to make the process as painless as possible.
    DivX now ships with malware. - Doom9's Forum

    Si veo que abre hilo nuevo sobre el tema lo comento aquí.

  10. #10
    pulgadas de pasión Avatar de baseq2
    Registro
    30 nov, 10
    Ubicación
    Mataró
    Mensajes
    2,045
    Agradecido
    1852 veces

    Predeterminado Re: Guía: Como mejorar la imagen por software y hardware

    Cita Iniciado por hemiutut Ver mensaje
    Ahora no se activan los pixel shaders,ni los 3 que tenía antes ni esté nuevo.
    ¿ Tengo que desinstalar el programa y volverlo a instalar ?.
    Gracias baseq2 por la ayuda .

    Saludos......
    No se que te está pasando. Esto solo añade un shader más sin cambiar nada de lo que tengas. No lo entiendo
    // Mi rincón: click // Sácale partido al Htpc: click // Calibra y vencerás: click //

  11. #11
    diplomado Avatar de hemiutut
    Registro
    02 dic, 11
    Mensajes
    6,361
    Agradecido
    7905 veces

    Predeterminado Re: Guía: Como mejorar la imagen por software y hardware

    Yo tampoco,acabo de desinstalar e instalar la versión 1.5.45955 y nada de nada .

  12. #12
    honorable Avatar de jaiport
    Registro
    29 ene, 11
    Ubicación
    Sabadell
    Mensajes
    949
    Agradecido
    823 veces

    Predeterminado Re: Guía: Como mejorar la imagen por software y hardware

    He puesto el filtro en el pot y lo he comparado con el darbee en varias imagenes fijas de diferentes películas
    Y la verdad es q en un ajuste suave del filtro y del darbee
    En una "cata a ciegas" me costaría saber cual es cual.
    Y ya tengo espolones con el darbee q lo uso hasta en la play ,otra cosa es cuando queremos forzar o aumentar mucho el filtro ya q le veo más ruido aunque el darbee tampoco se ve bien en valores extremos,
    Si lo llego yo a saber antes lo q me gaste en el darbee me valdria para la silver 3d jeje...saludos
    PHILIPH Oled 65 803
    Samsung PC50C7000,
    Benq W-1070
    Darbee Dablet
    Zidoo s9x
    Popcorn Vten
    Playstation 3-pa jugar
    Pioneer 924 - Magnat Monitor Supreme central252,Monitor202,Sub 302 .traseros dinavoice magic s4

  13. #13
    licenciado Avatar de atcing
    Registro
    15 jul, 08
    Mensajes
    23,424
    Agradecido
    26196 veces

    Predeterminado Re: Guía: Como mejorar la imagen por software y hardware

    Cita Iniciado por jaiport Ver mensaje
    He puesto el filtro en el pot y lo he comparado con el darbee en varias imagenes fijas de diferentes películas
    Y la verdad es q en un ajuste suave del filtro y del darbee
    En una "cata a ciegas" me costaría saber cual es cual.
    Y ya tengo espolones con el darbee q lo uso hasta en la play ,otra cosa es cuando queremos forzar o aumentar mucho el filtro ya q le veo más ruido aunque el darbee tampoco se ve bien en valores extremos,
    Si lo llego yo a saber antes lo q me gaste en el darbee me valdria para la silver 3d jeje...saludos
    Por fin se acabó la "magia"... y es que era cuestión de buscar...


    Un saludete
    "Nunca se conoce realmente a un hombre hasta que uno se ha calzado sus zapatos y caminado con ellos". - Matar a un Ruiseñor

    "Las burlas e insultos son las armas de quienes carecen de argumentación"

  14. #14
    pulgadas de pasión Avatar de baseq2
    Registro
    30 nov, 10
    Ubicación
    Mataró
    Mensajes
    2,045
    Agradecido
    1852 veces

    Predeterminado Re: Guía: Como mejorar la imagen por software y hardware

    Estoy esperando foticos de la gente. Lumasharpen vs shader... vs darbee....vs original....

    Por ejemplo:

    Original:


    Shader Sharpen:


    Shader Lumasharpen:


    *Estas fotos son con un ojo de buey dando de pleno en la pantalla. Bondades del gris

    Y si ya pusierais los parámetros utilizados con el Luma, sería la ostia jiji
    // Mi rincón: click // Sácale partido al Htpc: click // Calibra y vencerás: click //

+ Responder tema

Temas similares

  1. Vendo Software CalMan para calibración de TV y proyectores
    Por Anonimo20112023 en el foro Software
    Respuestas: 0
    Último mensaje: 21/09/2012, 19:48
  2. [Hilo oficial] Datos de ventas hardware y software
    Por Shinji Mikami en el foro Videojuegos
    Respuestas: 117
    Último mensaje: 25/09/2010, 09:19
  3. decodificador ONO ¿cómo mejorar imagen?
    Por ferw en el foro Receptores TDT, satélite, cable
    Respuestas: 9
    Último mensaje: 15/02/2008, 20:08
  4. Ventas de software y hardware en EE.UU ABRIL
    Por Fox Ender en el foro Videojuegos
    Respuestas: 23
    Último mensaje: 12/06/2006, 10:57
  5. Hardware y Software
    Por jtocho en el foro HTPC: Configuraciones hardware y software
    Respuestas: 1
    Último mensaje: 07/02/2005, 18:39

Permisos de publicación

  • No puedes crear nuevos temas
  • No puedes responder temas
  • No puedes subir archivos adjuntos
  • No puedes editar tus mensajes
  •  
Powered by vBulletin® Version 4.2.3
Copyright © 2025 vBulletin Solutions, Inc. All rights reserved.
Search Engine Optimization by vBSEO
Image resizer by SevenSkins